
Create a Monitor
Monitors let you take real-time actions on events in your workspace. Each one runs on every event and triggers automated actions when conditions are met.
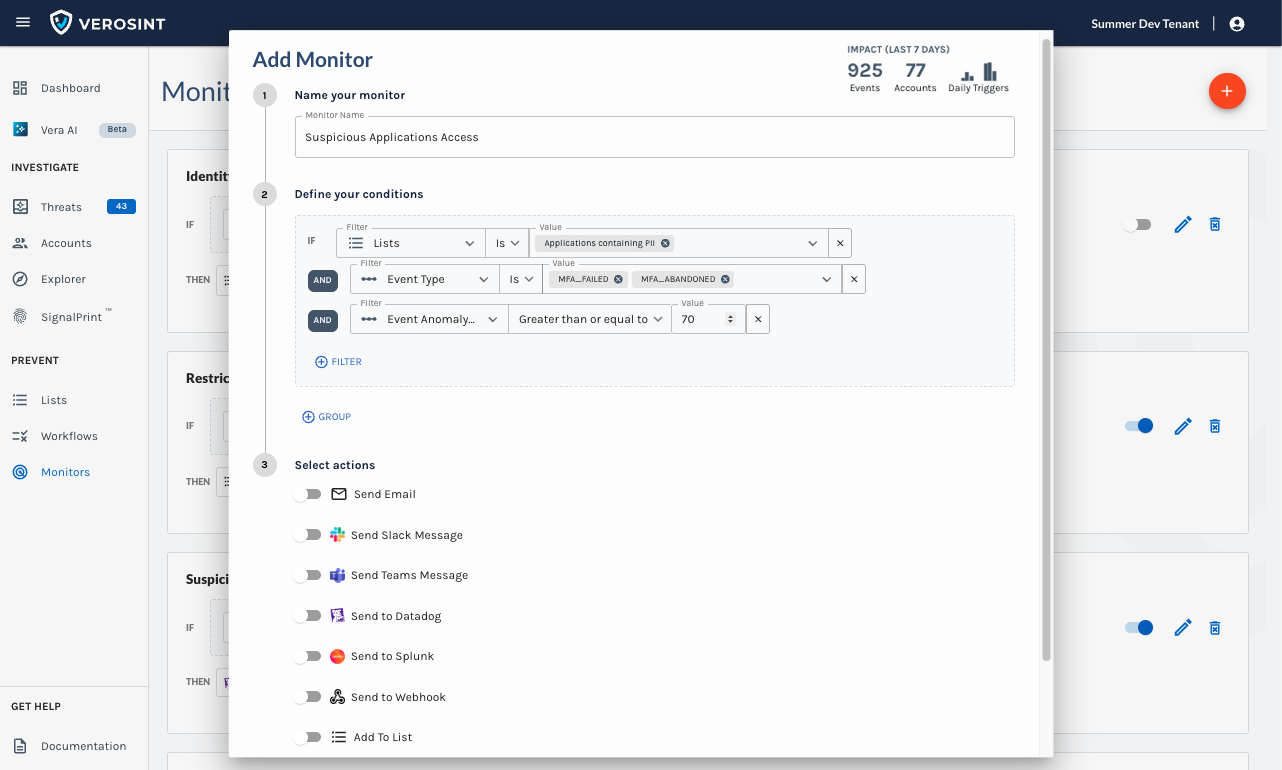
To create a Monitor:
-
Select Monitors from the navigation pane and click the + in the top right corner of the page.
-
Name the Monitor: Enter a unique name for the Monitor.
-
Define Conditions: Use the filter builder or custom expressions to specify the conditions you want to detect.
-
Standard Filters let you choose from Verosint’s powerful options, including Event Type, Identifiers, Lists, Risks, and a wide range of Signals tied to Email, IP Address, User Agent, Phone, Payment, and more.
-
Custom Filters: Use Common Expression Language (CEL) to create flexible, powerful rules for fraud detection (learn more about building CEL expressions here).
Some Verosint signals (e.g.,
account.asoCount.last24hours) are only available in Custom Filters (CEL mode). -
Impact (Last 7 Days) displays affected events and accounts, updating instantly as you tweak your filters. This feature is not available for custom filters (CEL mode).
-
-
Configure Automated Actions: Choose how you want Verosint to respond when your defined conditions are met. Supported actions include:
- Send Email: Trigger an email notification to specified recipients or distribution list.
- Send Slack Message: Trigger a message to specified Slack channels.
- Send Teams Message: Trigger a message to specified Microsoft Teams channels.
- Send to Datadog: Send event details as a JSON payload to Datadog.
- Send to Splunk: Send event details as a JSON payload to Splunk.
- Send to Webhook: Send event details as a JSON payload to a custom webhook.
- Add to List: Automatically add an entity (account, session, device, etc.) to a selected List for future monitoring or investigation.
- Remove from List: Automatically remove an entity from a selected list when risk is reduced or after successful step-up authentication.
-
Hit Create. The Monitor is live!
Required Integrations for Actions: Slack, Teams, Datadog, Splunk, and Webhook actions only appear if those integrations are already configured in your Account Settings.
Notification Payloads: For Datadog, Splunk, and Webhook, the event payload is identical to what you receive through your configured SIEM logs. See an example payload here.
Message Customization: To personalize your Email, Slack, or Teams messages, see Action Variables.
Create a Monitor
Every event flowing into Verosint is evaluated against your Monitors. When conditions are met, configured actions are automatically executed in real time.
Updated about 1 month ago