Configure an Auth0 Adaptive MFA Rule Set
You can create a Rule Set to prompt MFA during login or registration if:
- An account is new to the system.
- An account is a return account that has not previously been enrolled in MFA.
- An account is logging in from impossible travel parameters. For example, the account was registered from a location in New York, and then, five minutes later, the account was attempted to log in from a location in China.
Auth0 MFA should be configured in cases where any of the individual rule evaluations result in a "DENY" response.
Create the Auth0 Rule Set
-
On the Rule Sets page, click the + icon to create a new Rule Set.
-
Enter a name and optional description, and select a default action of DENY.
-
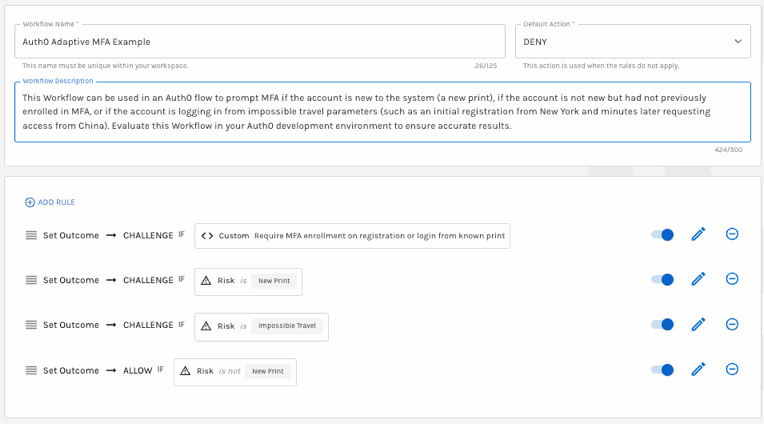
Configure a set of rules that require MFA, based on your business needs. The following is a sample:

Sample MFA Rule Set
-
Save your changes.
Rules and Auth0All properties from the Auth0 event object (
Actions Triggers: post-login - Event Object) are available to reference in the Auth0 Adaptive MFA template underparameters.<Auth0 property name>. You can set a rule outcome to ALLOW and have Auth0 prompt Login Success. You can also set an outcome to ALLOW_WITH_MFA to prompt Auth0 to require MFA. Set an outcome to DENY to reject a login attempt.
Each successful login (with an action of ALLOW or CHALLENGE) creates an event in the SignalPrint and the Explorer graphs.
Add the Auth0 Action
Once this Action is added to the Auth0 Post-Login flow, all logins for your tenant will be processed by this Action. Please make sure that all components have been configured correctly and verified on a test tenant.
- In your Auth0 tenant, select Add Integration.
- Read the necessary access requirements and click Continue.
- Configure the integration using the following fields:
API_KEY: Each time your application makes a request to Verosint, it authenticates with an API key for your Verosint account. This API Key can be found in the Account dropdown menu (API Keys > Copy API Key).
RULE_SET_UUID: The API key for the rules set you want Verosint to apply. This API Key is found in your Verosint rule (Rules > Rule > Copy API Key).
Base URL:https://api.verosint.com
MFA Re-prompt Frequency: The frequency (in seconds) to challenge for MFA. The default value is set to 36,000 seconds, or 10 hours. If a user successfully completes MFA within a session, it’s a bad user experience to keep requiring MFA if their risk level has not changed.
Require MFA Enrollment: Requires MFA for users not already enrolled. Login flows requiring MFA will be denied if the user is not already enrolled in MFA.
Application Metadata Key: The name of the key used to store the rule response on the user's application metadata. This is useful for debugging, but the response could also be used later to make decisions about how to accommodate users. When left blank, the rule result won't be stored in Auth0.
Log Only: See how your Verosint rule works without affecting the user experience. Setting this to true only logs the outcomes of the rule evaluations. - Click Create to add the integration to your Library.
- Click the Add to flow link on the pop-up that appears.
- Drag the Action into the desired location in the flow.
- Click Apply Changes.
This Action (when configured properly) will run right before Authentication time. The Action itself controls the authentication flow and will require MFA or deny access entirely if the rule evaluation is "DENY." Access attempts that triggered a DENY from one of the rules can be found in your Auth0 logs.
Updated 2 months ago